

Quick-Start Guide for RoadRunner with EFI Live
Getting your system up and running will take only a few short steps. This guide helps to outline what is needed, and should facilitate a rapid learning curve. Screen-shots are inserted to clarify what is meant in the instructions.
Step 1: Download the
Needed Files
There are
several downloads you will need, and they are listed here. Please download and
unzip or execute them in the order shown:
A) EFI Live 7.3.1 Update:
http://www.moates.net/zips/efilive/EFILiveV731_340_486_380.zip
(approx. 69mb)
Note: This can also be downloaded from EFI Live's website. Check your version
before downloading and installing. You may already be running the latest version.
- To install, unzip the EXE file contained in the ZIP file, and execute it.
This will bring your EFI Live installation to the most current revision. Don't
worry, your existing licensing information will be preserved.
-=-=-=-=->
Alternately,
you can go to the EFI Live website and download the newest 'full install' for
a fresh start with the latest released version. Here's the link:
http://www.efilive.com/download.aspx
-=-=-=-=->
B) Updated Calibration
Files: http://www.moates.net/zips/efilive/efilive_calibrations_20060303.zip
(approx 25mb)
Note: These files are updated to reflect what is needed for realtime updates
via the RoadRunner. Please replace your existing files in your installed calibrations
directory.
- This ZIP file should be unzipped so that the files it contains go to the 'Calibrations'
directory of your EFI Live installed location. For example, the correct location
is most typically "C:\Program Files\EFILive\V7\Calibrations\". Overwrite
existing *.cal files.
C) Updated Program Files:
http://www.moates.net/zips/efilive/EFILiveV732_361_520_430.zip
(approx 2.8mb)
Note: These files contain the EFI Live RoadRunner-enabled executables.
- Once again, you will want to unzip these files and overwrite the existing
files. This time, they will be going to the main EFI Live program directory.
This is typically "C:\Program Files\EFILive\V7\".
-=-=-=-=->
Alternately, you can go to the
EFI Live source for the VERY latest beta patch files:
http://efidownload.iqd.co.nz/software/RoadRunner/EFILiveV732_373_525_434.zip
-=-=-=-=->
D) USB Serial Virtual
Com Port Drivers: http://www.moates.net/zips/efilive/usb_drivers.zip
(approx 0.2mb)
Note: These driver files may be needed to communicate with the RoadRunner via
USB.
- Unzip the content of this file to a location where you can find it readily
(for instance, "C:\Drivers\Roadrunner\"). You will need to locate
these files when you connect the Roadrunner to the USB port of your PC.
NOTE! On some systems, the USB Serial Converter within the Roadrunner will be compatible with the existing drivers that are installed for your FlashScan cable. If that is the case, you can skip to Step 4 if you are not prompted by Windows to install the drivers when you plug the Roadrunner in.
Step 2: Connect the Roadrunner and Install the USB Drivers
a) You have already unzipped the USB Serial drivers. The next step is to plug in the device to the USB port.
b) Once plugged in, Windows will prompt you to search for the drivers. If it asks you to connect to the internet and search for the driver, tell it "No, not at this time".
c) If it asks you to install the software automatically, tell it you will "Install from a specific location (advanced).
d) Tell Windows to "Search for the best drivers in these locations", and specify only the directory where you put the driver files (C:\Drivers\Roadrunner for example).
e) Windows may give you a WHQL certification warning, but tell it to continue.
f) You may need to repeat this step once or twice to get the driver fully installed.
Step 3: Configure the Virtual COM Port Driver
a) Go to the Windows Start menu, and select the Control Panel. If it shows Category View, tell it to display the Classic View. Then select the 'System' option.
b) Now go to the 'Hardware' tab and select the 'Device Manager'. Go to the 'Ports (COM & LPT)' section, and expand it out. There should be an item there listed as 'USB Serial Port (COMx)', where x is typically 3 through 6. As long as x is less than 16, you should be fine. Double-click on the item to bring up its properties.
c) Once the USB Serial Port properties window is open, select the 'Port Settings' tab, and then click on the 'Advanced' button. You'll see an option called 'Latency Timer'. Please change this value to '1' with the pulldown menu. If you'd like to change the COM port designation, you can do so at this time. Click on 'OK', click on 'OK' again, and close the Device Manager and Control Panel windows.


Step 4: Configure EFI Live's Roadrunner Settings
a) Open up the EFI Live Tuning Tool program, and go to the 'Edit/Properties' menu (Alt-Enter).
b) Go to the Roadrunner tab. Select 'Virtual COM Port', and change the block size settings down to 12 and then back up to 16. Select 'OK' and close the Edit/Properties window.


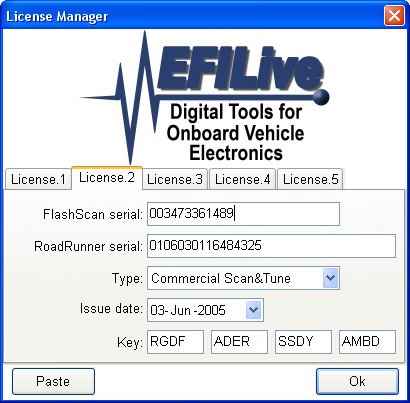
Step 5: Enter the EFI Live / Roadrunner License Information
a) You were provided with an email indicating what information you'll need to enter into the registration tab of EFI Live. Please locate that information so that you'll have it at hand.
b) Go to the 'Help/Register EFILive' menu option, and select an unused License tab. Here you will need to enter the license information that was provided to you via email. It must be entered exactly, including the correct FlashScan Serial Number, RoadRunner Serial Number, Flashscan License Type, Date, and Key.
c) Once you have checked this information entry and made certain it matches the information in the email associated with your new Roadrunner purchase, you should select 'OK' and exit the EFI Live program entirely.

Step 6: Begin Using EFI Live with your RoadRunner
a) Start up the EFI Live Tuning Tool program, and plug the RoadRunner into the USB port which you configured earlier.
b) Load up your favorite '*.tun' tuning file that you plan to use as a starting point. This might be a binary that you have read from an existing PCM.
c) Select the Roadrunner icon from the EFI Live menu bar. It looks like a 'fireball'. This will bring the Roadrunner control panel into view.
d) Click on the green 'connect' button and the Roadrunner information should be displayed. Make sure it says 'Emulation' and shows your Roadrunner serial number.


e) Click on the heavy red down-arrow in the Roadrunner control panel, "Program Roadrunner PCM with operating system and calibrations'. This will load the Roadrunner emulator with the entire content of the tuning file you loaded in step (6b). If it gives you an error, such as 'Roadrunner not licensed!', then you will want to check your license information entry and make sure it matches the information you were supplied with.
f) Click on the next icon to the right, which is "Update Roadrunner PCM as changes are made in real-time". From this point on in your session, any changes you make will be reflected immediately at the PCM. You'll see this indicated when the ROADRUNNER text lights up in red with 'real-time' on either side of it. You can click on the vertical dual chevron markings to reduce the Roadrunner control panel down to the main menu bar.


g) If your Roadrunner is equipped with an imbedded Flash chip (beginning mid-March 2006), you can select the icon which looks like two chips (black and red) with arrows between them, "Execute PCM from Flash memory", and red lettering 'Flash' will appear. If you select this, the PCM will operate from the imbedded flash exactly as though it were a 'standard' PCM. In that case, you can read the flash or reprogram the flash using your standard EFILive FlashScan tools. To put it back to emulation, just press the button again. To avoid confusion at this point, ALWAYS leave this button alone and make sure your display shows '[Emulation]'. There's no real need to operate from the imbedded flash unless you've programmed it as a sort of 'backup' system separately.
That's all there is to it! Now you're up and running with realtime emulation tuning.
If you have any questions or issues, please contact us at [email protected] and we'll get you up and running immediately.